How to Master the De-Matting Comb Like a Pro: The Groomer’s Secret
- Feb 19
- 16 min read

Mats are one of those problems that seem to appear overnight. A dog can look perfectly fine at drop off, then when I start working through the coat, I find tight little knots hiding in the exact spots pet parents swear they brushed yesterday. Behind the ears. Under the collar. In the armpits. Around the leg cuffs. These are high friction zones, and once tangles start, they tighten fast.
That is where the de-matting comb comes in. When it is used correctly, it can break up small mats safely, save coat length, and keep you from turning every brushing session into a wrestling match. When it is used incorrectly, it can pull, scratch, and make your dog hate being groomed at home. I see both outcomes regularly in the salon, and the difference is almost always technique, not effort.
I am going to show you exactly how I use a de-matting comb. You will learn when it is the right tool, when it is not worth pushing, and the step by step method that keeps de-matting controlled, gentle, and effective. By the end, you will be able to handle minor mats confidently and know when it is time to call your groomer instead.
What a De-Matting Comb Actually Does (and Why It Works)
A de-matting comb is designed to separate and loosen compacted hair, not “brush it out” the way a slicker brush does. Most de-matting combs have sharp, spaced blades or serrated teeth that slide into a tangle and gently split it into smaller sections. Once the mat is divided and loosened, you can brush and comb the remaining tangles out with much less pulling.
Think of it like this:
A slicker brush is great for everyday maintenance and catching early tangles. A de-matting comb is for when the coat has already tightened into a knot and you need to break the mat into manageable pieces before you brush.
What it does well
Splits mats so they are easier to work through
Targets specific knots in small areas (instead of brushing the whole dog aggressively)
Helps you save coat length when mats are mild to moderate
Reduces the “tug and fight” feeling dogs get when a mat is pulled as one solid clump
What it does not do
It does not “magically” remove a tight mat in one pass
It is not meant for full body dematting on a heavily matted dog
It should not be dragged through the coat like a brush
De-matting comb vs other common tools
De-matting comb (mat splitter): Best for small to moderate mats you can isolate.
De-matting rake: Best for thicker coats where you need to loosen undercoat and larger tangles, but it can remove a lot of hair fast.
Slicker brush: Best for daily or weekly maintenance and early tangles before they turn into mats.
Stainless steel finishing comb: Best for the final “comb test” to confirm the coat is truly mat-free.
If you remember one key point from this section, make it this: the de-matting comb is a splitting tool, not a pulling tool. That mindset alone prevents most of the mistakes I see at home.

When You Should Use a De-Matting Comb (and When You Should Not)
This tool shines in very specific situations. If you use it at the right time, it can save you a lot of frustration. If you use it at the wrong time, it can turn grooming into a painful experience for your dog.
Use a de-matting comb when:
The mat is small or moderate and you can isolate it. If you can hold the mat between your fingers and clearly feel where it starts and ends, that is usually workable.
The mat is in a high-friction area. These spots mat faster than most pet parents expect:
Behind the ears
Under collars and harness straps
Armpits and where the front legs rub the chest
Inner thighs and belly
The base of the tail
Leg cuffs and between the back legs
You can get at least a little movement in the hair near the skin. If the hair is not completely fused to the skin, you often have room to split and loosen safely.
You plan to follow with brushing and a comb check. The de-matting comb is the “break it up” step, not the final step.
Do not use a de-matting comb when:
The mat is tight against the skin and you cannot lift it. This is where I see accidental nicks and skin irritation happen, especially on thin-skinned areas.
The coat is pelted or felted. If the coat feels like one solid layer, de-matting at home is rarely kind or realistic.
Your dog is already stressed, reactive, or sensitive about that area. Even a mild mat can become a bigger behavioral issue if your dog learns grooming equals discomfort.
The mat is in a risky zone. Use extra caution, or skip at-home de-matting entirely, around:
Ear edges
Armpits
Groin
Tail tip
Under the collar line if the skin looks irritated
The quick “comb test” decision
Here is the simplest way to decide if you should stop and book a groomer:
If you cannot slide a regular metal comb into the coat at all near the base of the mat, do not force it. That mat is too tight, and the kindest option is usually professional de-matting or a short reset cut.

Prep Work: The Pro Setup That Makes De-matting Safer
Most de-matting problems I see at home are not because someone bought the wrong tool. They happen because the dog is not set up properly, the coat is worked on dry, or the mat is tackled before it is softened and separated. A few minutes of prep makes a dramatic difference in comfort and results.
Start with the right environment
Choose a stable, non-slip surface. A rubber bath mat on a table, a grooming mat on the floor, or even a towel on top of a washer works better than slick tile.
Use bright lighting. Mats hide in shadow, especially on darker coats.
Keep the session short. I would rather see you do 5 to 10 minutes daily than try to do everything in one long, stressful session.
What you need on hand
Detangling spray or light leave-in conditioner (this reduces friction and helps loosen the mat)
De-matting comb (your mat splitting tool)
Slicker brush (to brush out loosened hair)
Stainless steel finishing comb (to confirm the coat is actually tangle-free)
Treats (high-value, small, and frequent)
Why dry de-matting is a bad idea
Dry hair has more friction. More friction means:
more pulling on the skin
more breakage in the coat
more irritation in sensitive areas
Lightly misting the area with a detangler gives you “slip,” which is what keeps the de-matting comb from feeling harsh.
Prep steps I recommend before you touch the mat
Mist the mat lightly with detangler. You want the coat slightly damp, not soaked.
Use your fingers to find the edges of the mat. The edges are where you start, not the center.
Hold the hair at the base to protect the skin. This is one of the biggest professional habits that helps dogs tolerate de-matting.
A simple rule before you begin
If your dog is wiggly, tense, or trying to leave, pause and reset the moment. De-matting is not something to push through when your dog is escalating. Calm and controlled always wins.
Step-by-Step: How to Use a De-Matting Comb the Groomer Way
This is the method I use when I am trying to save coat safely without turning dematting into a tug-of-war. The goal is controlled progress in small sections. If you go slow and stay organized, you will get better results and your dog will tolerate it far more easily.
Step 1: Isolate one mat at a time
Do not start by dragging the tool through a large area of coat. Find one mat and separate it from surrounding hair with your fingers.
A good target is a mat you can hold between your fingertips without grabbing a huge chunk of coat.
Step 2: Protect the skin with your non-tool hand
This is the “groomer secret” that matters most.
Place your fingers at the base of the mat, close to the skin.
Hold the hair firmly enough that your dog’s skin does not move when you work.
If the skin moves, your dog feels every tug.
Step 3: Start at the outer edge of the mat
Always work from the outside of the mat toward the center.
If you start in the middle, you tighten the knot and pull harder than necessary.
Step 4: Use tiny, short strokes
A de-matting comb is not a brush. It is a splitting tool.
Insert just the tips of the blades into the mat’s edge.
Make 1 to 3 short, controlled motions.
Lift out and reassess.
You should never be “sawing” fast or dragging the comb all the way through the coat.
Step 5: Split the mat into smaller pieces
Once you get a little separation, split again.
I like this rhythm:
split a little
stop and feel the mat
split again
then switch tools
When the mat breaks into smaller pieces, brushing becomes much easier.
Step 6: Switch to your slicker brush
After you loosen a section, brush it out gently with a slicker brush. This removes the freed hair and prevents it from tangling right back together.
Keep the brushing light and controlled. If you are brushing aggressively, the mat is still too tight.
Step 7: Finish with the metal comb test
This is how you know you are truly done.
Run a stainless steel comb through the area from skin to ends. If it glides through without snagging, the mat is gone. If it catches, there is still compacted hair that needs to be loosened further.
Step 8: Reward and take breaks
I strongly recommend pausing every minute or two to reward your dog. A calm dog is safer to groom, and you will get more done in less time.
Common Mistakes I See With De-Matting Combs (and How to Fix Them)
Most dogs do not “hate grooming.” They hate the way grooming feels when something pulls, scratches, or goes on too long. These are the issues that show up most often when pet parents are doing their best but the de-matting comb technique is working against them.
Mistake 1: Pulling the mat like you are brushing
What happens: The mat stays tight, the skin gets tugged, and your dog learns to flinch or avoid the tool.
Fix: Use the de-matting comb to split, then switch to a slicker brush to remove. Short strokes only.
Mistake 2: Starting in the center of the mat
What happens: You compress the knot and make it harder to loosen.
Fix: Always start at the outer edges and work inward. The edges are where hair has the most give.
Mistake 3: Not holding the hair at the base
What happens: Every motion pulls the skin. Even gentle motions feel sharp to your dog when the skin moves.
.
Fix: Anchor the coat with your free hand. If you only change one habit, change this one.
Mistake 4: Working too fast and creating friction burn
What happens: The area turns pink, feels warm, and becomes sensitive. This can happen quickly, especially in armpits, behind ears, and groin.
Fix: Slow down. Do a few short motions, then pause. If the skin looks irritated, stop for the day.
Mistake 5: De-matting completely dry
What happens: The tool drags, hair breaks, and you need more force to make progress.
Fix: Light mist of detangler or a grooming spray for slip. You want the coat slightly damp, not soaked.
Mistake 6: Trying to “save the coat” when the mat is too tight
What happens: You lose more hair, your dog gets stressed, and the area often still ends up needing a shave out.
Fix: If you cannot lift the mat away from the skin or slide a metal comb near the base, stop and book your groomer.
Sometimes the kindest solution is a reset cut.
Mistake 7: Skipping the comb test
What happens: You think the mat is gone, but tight tangles remain near the skin. Those tangles turn into mats again within days.
Fix: Always finish by running a metal comb through the area from skin to ends. If it snags, keep working gently or stop and reassess.
A simple “safety filter” I recommend
If your dog is showing stress signals like lip licking, sudden panting, head turning, snapping at the air, or trying to eave, treat that as information. It usually means one of three things:
the mat is too tight
you are pulling skin
the session is too long
Safety First: How to Know When You Should Stop
This is the part I wish every pet parent understood, because it protects your dog’s skin, your relationship with grooming at home, and your dog’s comfort long-term. There is a point where dematting stops being helpful and starts being unfair. A de-matting comb is a useful tool, but it is not worth pushing through pain or escalating stress.
Stop immediately if you see these signs on the skin
Pink or red skin developing quickly
Warmth in the area (a sign of irritation from friction)
Tiny scabs, flaking, or already irritated skin under the mat
You notice a strong odor or dampness trapped under the mat (this can indicate skin infection or moisture issues)
If any of these are present, continuing can make the skin more inflamed and sensitive, and it often makes the next grooming appointment harder too.
Stop if the mat is too tight to safely separate
Here are the clearest “too tight” indicators:
You cannot lift the mat even slightly away from the skin
The mat feels like it is glued down
You cannot slide a regular metal comb into the coat near the base at all
The hair clumps feel thick and solid, like felt
When mats are tight at the skin, the risk of pulling, bruising, or nicking the skin goes up quickly. In those cases, a professional shave-out or shorter cut is usually the kindest option.
Stop if your dog’s behavior changes
Even dogs that normally tolerate brushing can hit a limit fast with de-matting. Watch for:
Lip licking, yawning, or turning the head away
Tensing the body or “freezing”
Sudden panting when the room is not warm
Whining, growling, snapping at the air, or trying to escape
If you see escalation, stop the session. Pushing through can create long-lasting grooming anxiety, especially if your dog learns the de-matting comb predicts discomfort.
What a groomer may recommend instead
If de-matting is not realistic, here is what I commonly suggest in the salon:
Spot shave-outs for a few tight mats, especially in armpits and behind ears
A shorter reset haircut when mats are widespread or the coat is pelted
A maintenance schedule that prevents repeat matting (often every 4 to 8 weeks, depending on coat)
A home routine built around brushing and comb checks, so the coat stays manageable between visits
The kindest mindset shift
If you are trying to choose between “saving hair” and “keeping your dog comfortable,” always choose comfort. Hair grows back. Grooming trust is harder to rebuild once it is lost.
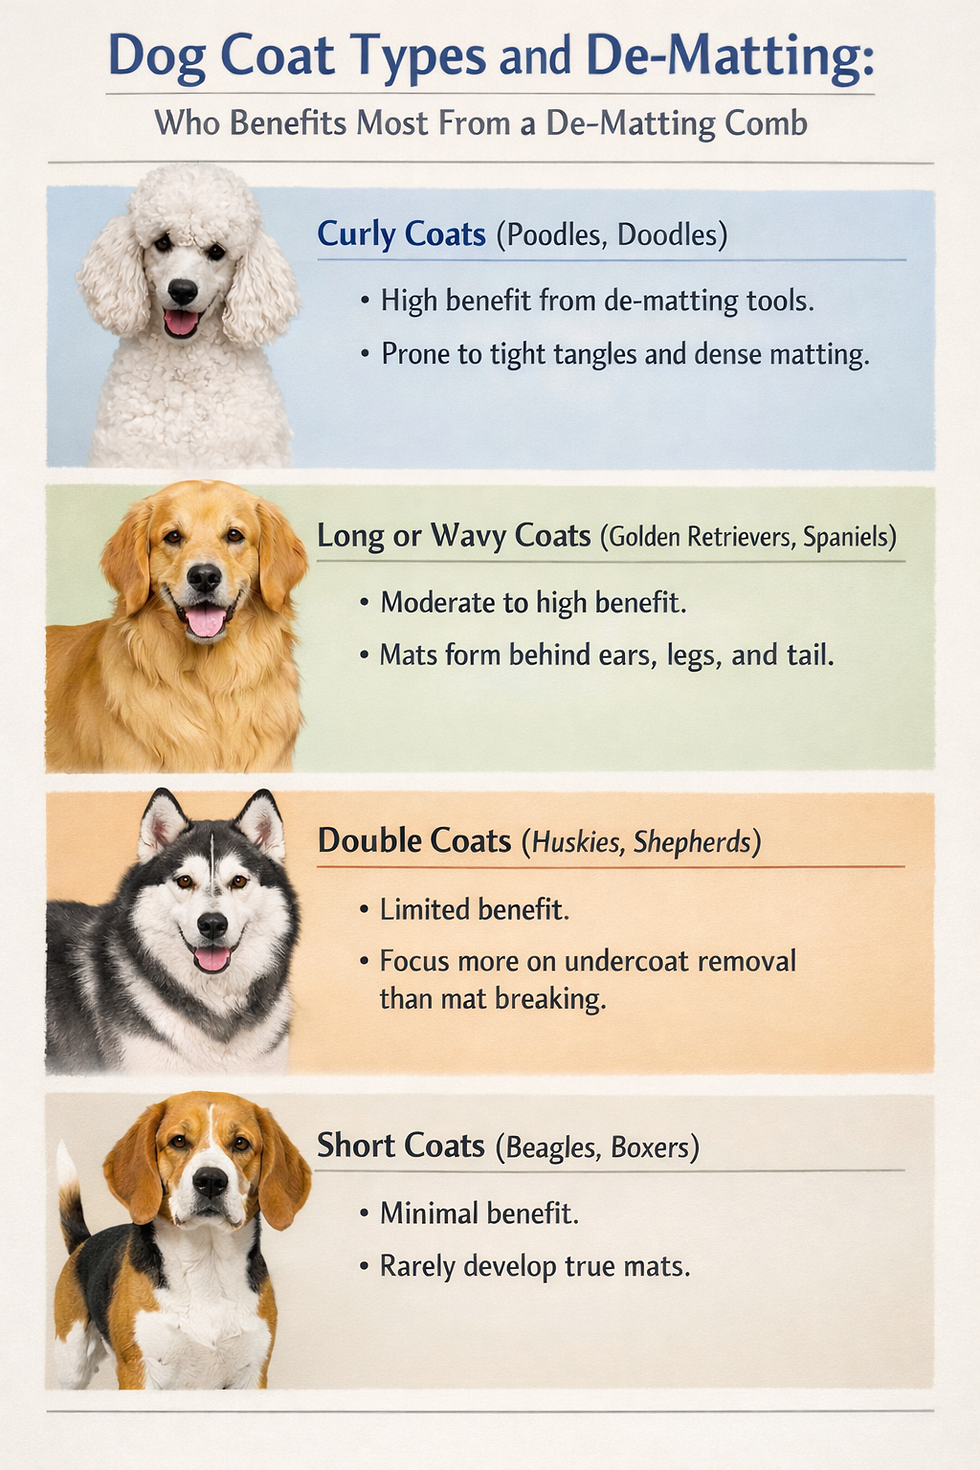
Coat Types and De-matting: Who Benefits Most From a De-Matting Comb
One reason de-matting advice can feel confusing online is that coat type changes everything. The same tool that works beautifully on a curly doodle coat can be a poor choice on a fine, silky coat, and it can create avoidable damage on certain double coats if it is overused. Here is how I look at it in the salon.
Curly and wavy coats (doodles, poodles, bichons)
These coats are the most common “mat makers” because the hair curls back on itself and tangles easily, especially when it is longer.
A de-matting comb can help when:
Mats are small to moderate and limited to friction zones
You are working on a coat that is otherwise maintained
You are following with a slicker brush and a metal comb
Extra tip: Curly coats often hide tight tangles close to the skin. The comb test matters most here.
Drop coats and silky coats (Shih Tzu, Maltese, Yorkie mixes, Havanese)
These coats can mat quickly, but the hair is also more prone to breakage if you are too aggressive.
A de-matting comb can help when:
You are splitting a small knot that is not skin-tight
You use very light pressure and short strokes
Watch out for: Over-splitting and repeated passes, which can cause the coat to look thin or choppy.
Thick double coats (Golden Retrievers, Aussies, Huskies, many mixes)
Double coats are tricky. Mats often form in the undercoat, especially behind the ears, in the pants, and under collars. A de-matting comb can remove undercoat quickly, but it can also leave the coat uneven if it is used too aggressively.
A de-matting comb can help when:
The mat is in undercoat only and you can lift it from the skin
You are using it sparingly and following with brushing
Watch out for: Creating “holes” or thin spots, especially over the hips, shoulders, and behind the ears.
Fine, thin, or fragile coats (senior dogs, puppies, certain small breeds)
Thin skin and fragile hair raise the stakes. Even mild pulling can be uncomfortable.
A de-matting comb can help when:
The tangle is small and you can fully isolate it
Your dog tolerates handling well
You keep sessions very short
In many cases: A slicker brush, detangler, and careful hand separation are safer than reaching for a bladed tool.
Wire coats and hand-stripped textures (some terriers)
These coats usually do not mat the same way, but they can tangle in furnishings and beard areas.
A de-matting comb can help when:
You are working through small tangles in legs or beard
You are careful not to shred the texture
Watch out for: Overuse that softens the coat and removes too much coat structure.
At-Home Maintenance Plan to Prevent Mats From Coming Back
Once you have removed a mat, the coat in that area is almost always more likely to tangle again. Hair that has been compacted, split, or broken tends to grab onto itself. That is why prevention is the real “pro move.” The goal is not to de-mat better every week. The goal is to stop mats from forming in the first place.
The 60 second daily mat check
If you only have time for one habit, do this quick check once a day, especially for curly and long coats:
Behind the ears
Under the collar or harness straps
Armpits and chest where the front legs rub
Inner thighs and belly
Tail base
Leg cuffs and between the back legs
Run your fingers through those spots. If you feel a snag starting, handle it that day while it is still a tangle, not a mat.
Brushing schedule by coat type
These are realistic maintenance ranges I recommend to many clients:
Curly coats and doodles: light brushing and comb check most days, with a thorough session 3 to 5 times a week
Drop coats and long silky coats: quick daily check, full brush and comb 3 to 4 times a week
Double coats: 1 to 3 times a week depending on shedding season, with extra focus behind ears and pants
Short coats: no de-matting needed, but regular rubber brushing helps reduce shedding
If your dog is in a longer style, you almost always need a more frequent home routine. Longer coat equals more friction and more tangles.
The simple routine that works
This is the order that keeps coats tangle-free without overworking the hair:
Light mist with detangler: Just enough to add slip. Avoid soaking the coat.
Slicker brush using small sections: Focus on one area at a time instead of sweeping over the top.
Metal comb check from skin to ends: This is how you confirm you did not miss the under layer.
If the comb does not go through, the coat is not finished, even if it looks smooth on top.
Pay attention to friction triggers
A dog can be well maintained and still mat if friction is constant. Common triggers include:
Harnesses worn all day
Collars that twist and rub
Jackets, sweaters, and raincoats
Rolling in sand, snow, or burrs
Swimming and air drying without brushing
If your dog swims or gets wet often, plan on brushing and combing the same day.
Grooming appointment timing matters
In the salon, I can usually predict matting problems based on schedule alone. If your dog is in a longer haircut and you are going 10 to 12 weeks between grooms, mats are very likely, even with good intentions at home.
Many coat types do best on a:
4 to 6 week schedule for curly and long coats
6 to 8 week schedule for moderate maintenance styles
seasonal schedule for short-coated dogs, depending on shedding and skin needs
FAQ: De-Matting Combs and Safe De-matting at Home
Does de-matting hurt dogs?
It can, especially if the mat is tight at the skin or the coat is worked too aggressively. When de-matting is done correctly, it should feel more like gentle tugging than sharp pulling. If your dog is flinching, trying to leave, or the skin is turning pink quickly, stop. At that point, the kindest option is usually a professional groom or a shorter reset cut.
Can I use a de-matting comb on a wet coat?
I do not recommend working on a soaking wet coat. Wet hair stretches and breaks more easily, and mats can tighten as they dry. A better option is a light mist of detangler on a dry or slightly damp coat, then demat in small sections. If your dog has been bathed, fully dry the coat first and then address tangles gently.
What is better: a de-matting comb or a de-matting rake?
They are built for different jobs.
A de-matting comb (mat splitter) is best for isolating and splitting small to moderate mats in specific spots.
A de-matting rake is often better for loosening undercoat and broader tangles in thicker coats, but it can remove a lot of hair quickly if you are not careful.
If you are trying to save coat in one or two tight knots, the comb is usually the better choice. If you are dealing with heavy undercoat buildup, a rake may be more efficient.
Is it safe to use a de-matting comb behind the ears?
Behind the ears is one of the most common matting spots and one of the easiest places to irritate skin. It can be safe if the mat is small, you can lift it slightly away from the skin, and you anchor the hair at the base while you work. If the mat is tight and skin-level, I recommend letting a groomer handle it. Ear edges are delicate and easy to nick.
How do I remove mats in the armpits safely?
Armpits are high risk because the skin is thin and stretchy. If the mat is mild, you can sometimes loosen it with detangler, finger separation, and very careful splitting. If the mat is tight or your dog reacts quickly when you touch the area, do not push it. In the salon, armpit mats are often safest to shave out rather than fight through.
Should I cut mats out with scissors?
In most cases, no. Matting pulls skin up into the knot, and it is very easy to cut skin accidentally, especially in armpits, groin, and behind ears. If you must cut anything at home, use extreme caution and consider an electric clipper with a guard instead, but even that can snag. The safest path for significant mats is a groomer or veterinarian.
How long should a dematting session take?
Shorter is almost always better. I recommend 5 to 10 minutes at a time, then a break. Longer sessions increase stress and skin irritation. You can make better progress over a few short sessions than in one long battle.
How do I know the mat is actually gone?
Use the comb test. A stainless steel comb should glide through the area from skin to ends without snagging. If it catches near the skin, there is still compacted hair that will re-mat quickly.
When is shaving the kindest option?
Shaving is often the kindest option when:
Mats are tight against the skin
Large areas are pelted or felted
Your dog is stressed or painful during brushing
Skin looks irritated underneath the matting
Hair grows back. Comfort and trust matter more.
My dog keeps matting even though I brush. Why?
This is extremely common. Usually one of these is happening:
You are brushing the top layer but not reaching the under layer
The friction zones are being missed (behind ears, armpits, collar line)
The dog is getting wet and air drying without a brush out
The haircut is longer than the current home routine can maintain
The dog’s coat texture (especially doodles) mats faster than expected
If you want, tell me your dog’s breed or coat type and current haircut length, and I will suggest a realistic brushing schedule and tool combo that matches it.


Comments