How to Comb Your Dog's Coat Like a Professional: A Metal Comb Guide for Pet Parents

Every professional groomer has their trusted tools, but none is more essential than a quality metal comb. While brushes get most of the attention, I consider the humble metal comb the secret weapon that separates amateur home grooming from professional-level coat care. We've seen countless pet parents struggle with matted coats, missed tangles, and grooming frustration. All problems that could be solved with proper metal comb technique. Whether you're maintaining your dog's coat between our professional grooming sessions or learning to groom at home, mastering the metal comb will transform your approach to canine coat care.
CHOOSING THE RIGHT METAL COMB FOR YOUR DOG'S COAT TYPE
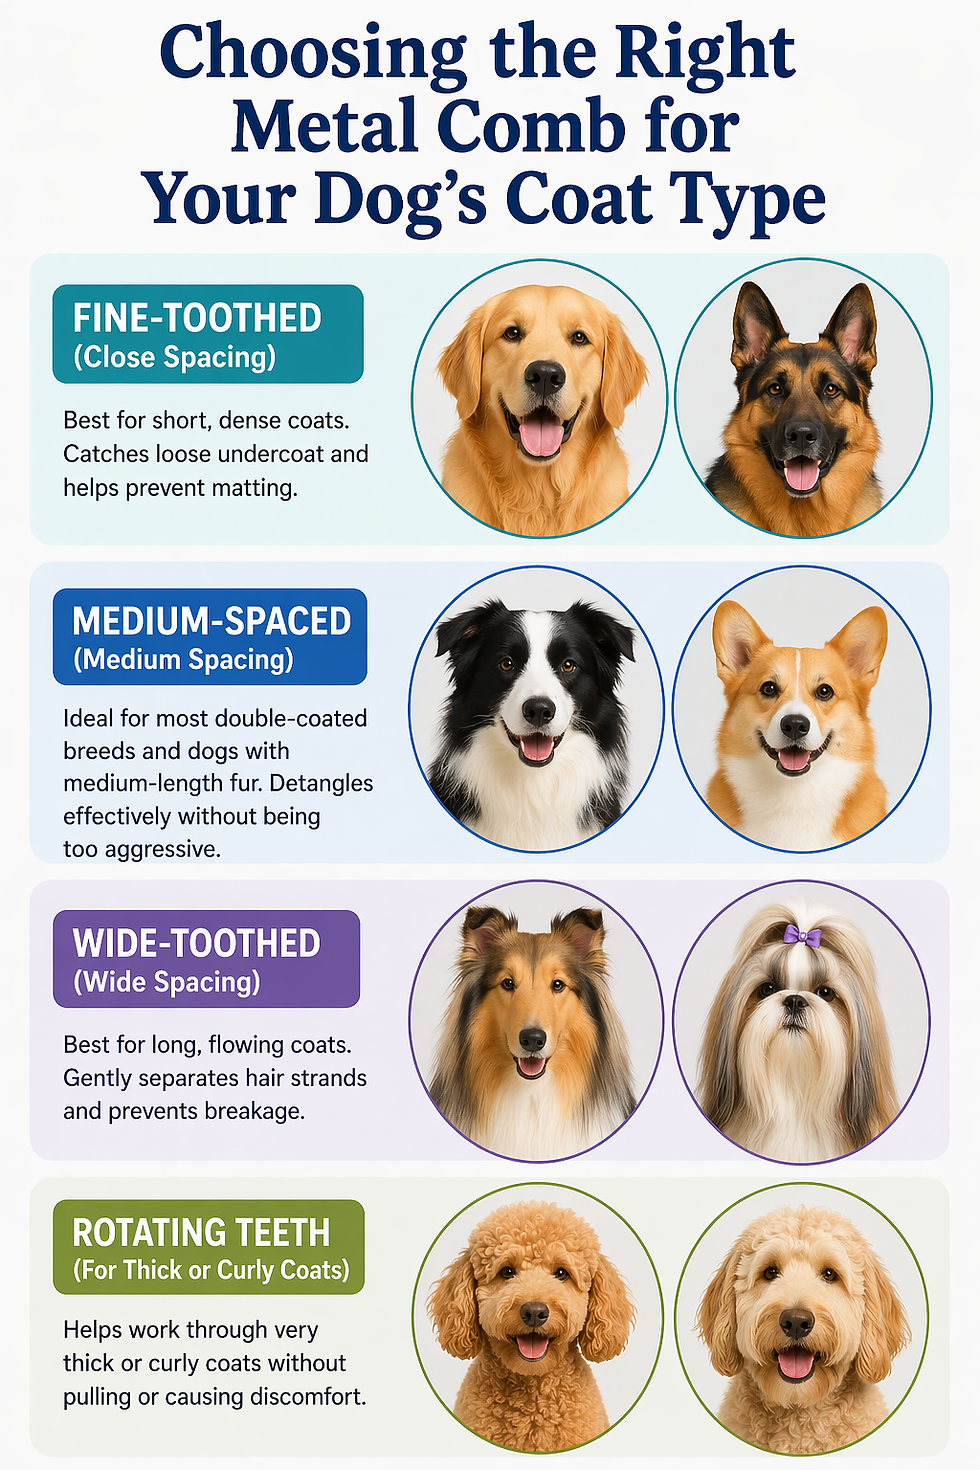
Selecting the appropriate metal comb depends primarily on your dog's coat density and length. Fine-toothed combs work best for dogs with short, dense coats like Golden Retrievers or German Shepherds, as the closer spacing catches loose undercoat and prevents matting. Medium-spaced combs are ideal for most double-coated breeds and dogs with medium-length fur, providing effective detangling without being too aggressive.
Wide-toothed combs serve dogs with long, flowing coats such as Afghan Hounds or Yorkies, where gentle separation of hair strands is crucial. For dogs with very thick or curly coats like Poodles or Doodle mixes, consider a comb with rotating teeth that help work through dense areas without pulling. The tooth length should correspond to your dog's coat depth. Longer teeth for thicker coats, shorter teeth for finer fur.
Special consideration should be given to combination combs that feature different spacing on each end. These versatile tools allow you to start with wider spacing for initial detangling, then finish with finer teeth for thorough checking. Some metal combs also include features like rounded tips for sensitive skin or ergonomic handles for extended grooming sessions.
PROFESSIONAL COMBING TECHNIQUES: STEP-BY-STEP METHOD
Professional grooming success starts with proper technique. Here's how we approach combing at our shop:
Step 1: Position the Comb Correctly
Hold the comb at a slight angle to your dog's skin, never perpendicular. Use gentle, consistent pressure that moves through the coat without digging into the skin.
Step 2: Start Each Stroke at Skin Level
Begin each stroke at the skin level and draw the comb through the entire length of hair in smooth, deliberate motions.
Step 3: Work in Small Sections
Divide the coat into small sections, roughly 2-3 inches wide. This gives you thorough coverage without overwhelming your pup.
Step 4: Follow the Right Order
Start from the back legs and work forward. This approach helps your dog get comfortable with the process before you move to more sensitive areas like the face and chest.
Step 5: Comb With and Against the Grain
Comb in the direction of hair growth first, then lightly comb against the grain to lift the coat and check for any missed tangles.
Step 6: Read Your Dog's Signals
Maintain a steady rhythm and watch your dog's body language throughout. If you encounter resistance, stop and examine the area rather than forcing the comb through.
Step 7: Handle Snags Properly
When you hit what feels like a snag, it's usually a small mat that needs gentle teasing apart with your fingers before continuing. For tougher mats, switch to a slicker brush or de-matting tool to work through the tangle without pulling on your dog's skin. Once the mat is loosened, return to your metal comb to finish the area. Work slowly and methodically, just like we do. Rushing leads to discomfort and missed problem areas.
MAT PREVENTION AND EARLY DETECTION STRATEGIES
Your metal comb serves as an early warning system when used correctly. During regular combing sessions, pay attention to areas where the comb slows down or encounters slight resistance, these are future mat locations. Addressing these spots immediately with gentle finger separation and targeted combing prevents them from developing into painful, tight mats that require professional removal.
High-friction zones like where collars sit, under the arms, and on the rear legs should receive daily attention with your metal comb. These areas mat faster due to constant movement and moisture, so incorporating them into a quick daily routine prevents major problems. Spend just a few minutes each day running your comb through these trouble spots rather than waiting for weekly full-body sessions.
Seasonal changes also affect mat formation patterns. During shedding seasons, increase your combing frequency as loose undercoat can trap against the remaining fur and create instant mats. Similarly, after outdoor activities, swimming, or rainy walks, use your metal comb to work through the coat while it's still slightly damp—this prevents mats from setting as the coat dries.
TACKLING PROBLEM AREAS: EARS, LEGS, AND SENSITIVE SPOTS
The areas behind your dog's ears are notorious for rapid mat formation due to moisture from drinking and natural oils from the skin.
- Use shorter, lighter strokes in this region
- Consider switching to a finer-toothed comb for better control
- Work from the base of the ear outward
- Be especially gentle near the ear canal where skin is most sensitive
Leg feathering and armpit areas require special attention due to friction from movement.
- Perform daily light combing to prevent mats from forming
- Use an upward combing motion on the legs to separate the feathering
- Smooth downward to lay the coat properly
- For armpit areas, gently lift the leg and work the comb through the hair in the direction it naturally flows
The tail and rear end areas need careful handling due to sensitivity and the tendency for debris accumulation.
- Comb the tail hair in sections, supporting the tail itself to prevent discomfort
- For sanitary areas, use light, quick strokes and maintain extra gentleness
If your dog shows signs of discomfort in any area, take breaks and offer treats to create positive associations with the grooming process.
COMMON COMBING MISTAKES PET PARENTS MAKE
The most frequent error pet parents make is using too much pressure or speed, which can cause skin irritation and make dogs resistant to future grooming. Professional groomers know that effective combing is about patience and consistency, not force. If you find yourself pressing hard or moving quickly to get through tangles, you're likely creating a negative experience that will make subsequent sessions more difficult.
Another common mistake is focusing only on the surface coat while missing the undercoat layer where most problems begin. Many pet parents assume that if the top coat looks smooth, the job is complete. However, hidden mats in the undercoat will continue growing and eventually surface as major problems. Always ensure your comb reaches all the way to the skin level.
Skipping sensitive areas or rushing through them is counterproductive to long-term grooming success. While it might seem easier to avoid areas where your dog shows resistance, these spots typically need the most attention. Instead of avoidance, work slowly and use positive reinforcement to help your dog become comfortable with complete body grooming. Incomplete grooming sessions often result in problem areas that require professional intervention.
MAINTAINING YOUR METAL COMB FOR LONG-TERM SUCCESS
Proper maintenance keeps your metal comb performing at professional levels for years. After each grooming session, remove all hair from the teeth using a cleaning brush or even another comb. Hair buildup reduces effectiveness and can harbor bacteria or odors. Wash your comb regularly with warm, soapy water, ensuring you clean between each tooth thoroughly.
Dry your metal comb completely after washing to prevent rust or corrosion. Store it in a dry location, preferably in a designated grooming kit where the teeth won't be damaged by contact with other tools. Avoid dropping your comb on hard surfaces, as this can bend or misalign the teeth, reducing its effectiveness and potentially causing discomfort to your dog.
Inspect your comb regularly for signs of wear, including bent teeth, rough edges, or loose handles. A damaged comb can snag hair and cause pain, making your dog resistant to grooming. Quality metal combs can last for years with proper care, but knowing when to replace your tools is essential for maintaining professional-level results at home.
MASTER THE PROFESSIONAL DIFFERENCE
Learning to use a metal comb like a professional groomer transforms your ability to maintain your dog's coat health and appearance. The techniques and knowledge shared here represent years of professional experience that can help you provide better care for your furry family member. Remember that grooming is a skill that improves with practice, so be patient with yourself and your dog as you develop these new abilities. At Riverview Grooming, we're always here to help when you need professional support or want to learn more advanced techniques for keeping your dog looking and feeling their best.


Comments